How To Epoxy Bar Top Rail Trim
By Roderick Kabel
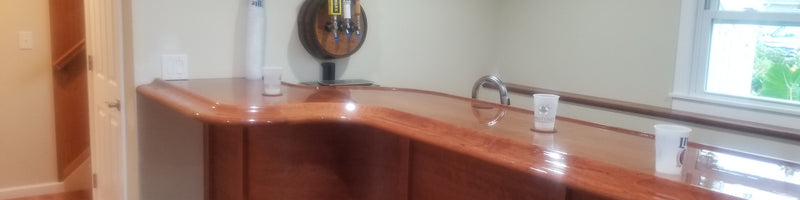
Every bar top is different and has its own uniqueness when it comes to size, style, and shape. Some bar tops have simple to complex rail trim, and some don’t have a rail at all. Which is fine. The love and beauty of a bar is in the eyes of the beholder.
This post will focus on how to pour WiseBond® Bar and Table Top epoxy on a bar top with raised rail trim and a spill guard.
Typically, we deal with the sides and edges of a bar top or table after we pour the flood coat over the flat surface. As per, we simply push the epoxy flood coat from the surface to roll and flow over the sides and edges. But in this situation, the raised bar railing should be dealt with first.
First if you already haven’t done this, check for gaps between the bar surface and the rail trim. If it is not water tight, epoxy will run through. Use painter's tape on the underside which can be pulled off once the epoxy is cured. You can also use a silicone caulk on the underside to fill any gaps however the silicone most likely will not come off after the pour.
As always, let’s be sure to seal the entire bar top and rail with 1-3 seal coats. Again, all wood species have different porosity and a proper seal coat is key to a bubble free epoxy! Here is a link and refresher course on how to apply a seal coat. https://youtu.be/bi2jjqw9WT4
Now it’s time to figure out how much bar top epoxy will be needed. Use our online calculator to determine the amount of epoxy you will need, and add 1 extra WiseBond® Bar and Table Top epoxy kit. This should ensure you have plenty of epoxy. It’s called a “flood coat” for a reason, you know! https://www.wisebond.com/pages/wisebond-epoxy-calculator
Because sanding upside down is a huge pain, be sure to put painter's tape on the underside of the bar rail trim outside edge. This will catch epoxy drips and you can easily remove drips by peeling off the tape. An easy method to do this is to use a wide tape pressed onto the underside with a 1/4" overhang. Burnish the tape with your finger or a flat edge of some sort and then with a new, sharp razor blade, trim off the overhang flush with the rail trim bottom edge. (This works great for any table to remove epoxy drips!)
Mix your WiseBond® table top epoxy using the proper 1:1 ratio using a clear bucket with measurements. With a rubber gloved hand, dip your fingers in the epoxy and “wet” (slather) all of the rail trim in a smooth thin layer. This will guarantee a smooth flow of epoxy during the flood coat over the bar top rail trim.
Once the bar top trim is wet, grab your bucket of epoxy. Starting at one end of the bar, move your way all along the bar slowly pouring (don't drizzle) epoxy in an appropriate “flooding” thickness all along the trim. The epoxy will flow nicely since the trim is already wet. This will apply a smooth coat of epoxy all along the trim.
NOTE: Yes, because there may be vertical portions on the rail trim, the epoxy will run thin. If you want thicker epoxy on the trim, you will need to let the first bar rail pour cure, and then do another pour as a second coat. If you do this, the second pour can be completed as soon as the first epoxy coat is at a hard sticky tack. It doesn't need to be fully hard. (Cover the bar rail trim to prevent dust contamination while the first coat cures.)
After the rail trim pour is to your liking, obviously there will be run-off of epoxy onto the top of the bar surface, which is fine. It won't be much. If you feel the run-off is too thick at the vertical edge where the trim and bar surface meet - while the epoxy is still wet - just spread the extra epoxy in a thin layer away from the area onto the flat surface of the bar.
If you choose to allow the rail trim epoxy to cure or you want to pour the bar top surface while the rail trim is still wet, it is totally your decision.
At this junction it is also the perfect time to embed any sort of memorabilia or objects on the bar surface if you so choose. If you do, be sure to secure any object tightly and flat to the bar surface. Epoxy works very well. Furthermore, you will want said objects to cure before pouring the bar top surface.
Now let’s pour the bar top flood coat onto the bar surface. Typically, an 1/8" of an inch thickness is sufficient. This final pour will cover any epoxy you’ve spread out and the epoxy will self-level seamlessly up to the trim nicely.
However, BE CAREFUL that you don’t dribble and drip epoxy over the bar rail trim!
As for the bar top spill guards, treat it the same way as above but in a miniature version.
Lastly, always drape the bar with plastic as a covering to prevent dust and dirt from contaminating the epoxy and trashing your bad-ass bar top.
Cheers!

Leave a comment